How Can We Help?
Owners
Overview
This guide provides instructions on how to manage homeowner information within your HOA. Properly maintaining owner records is essential for an organized and up-to-date directory.
Navigating to the Owners Section
- From the main dashboard, click on the ‘Directory’ menu.
- Under this menu, select ‘Owners’ to access the homeowner information.

Viewing Homeowner List
- A list of units along with their respective owners’ names, addresses, emails, and phone numbers will be displayed.
- Use the ‘Quick search’ feature to locate specific owners or navigate through the list using the pagination controls at the bottom.

Adding a New Homeowner
- Click on the ‘+ Add New Owner’ button to enter a new homeowner into the system.
- Fill in the details of the homeowner:
- ‘Unit Title’: the name or identifier of the property.
- ‘1st Owner Name’ and ‘2nd Owner Name’: full names of the property owners.
- ‘E-Mail’ and ‘Phone’: contact details for each owner.
- Set the ‘Status’ to indicate the current ownership status (e.g., ‘Active Owner’, ‘Pending Ownership Transfer’, etc.).
Editing Homeowner Information
- To update an owner’s information, click on the edit icon (pencil) next to the owner’s entry.
- Make the required changes in the respective fields.
Saving or Deleting Information
- Click ‘Save’ to update the homeowner’s details.
- To remove a homeowner from the directory, click ‘Delete’.
Additional Features
- The ‘Filter’ option can be used to display only specific entries based on criteria.
- ‘Display/Print’ provides options to output the information in various formats.
Tips
- Regular verification of contact details ensures efficient communication with homeowners.
- Keep the ownership status updated to reflect any changes in property ownership accurately.

How To Setup Alternate Owner Addresses
RunPTO allows you to enable and use an Alternate Address for owners in directory listings and printed mail. This feature is useful when an owner has multiple addresses and needs a different one for correspondence.
Step 1: Enable Alternate Address in Directory Settings
- Navigate to Directory Info in the Administration/Setup section.
- Locate the Show Alternate Address option.
- Select Yes to enable alternate addresses for owners.
📌 Once enabled, this setting allows alternate addresses to be assigned and displayed in the Owner Directory.

Step 2: Set Up an Alternate Address for an Owner
- Go to the Owner Directory.
- Select the owner for whom you want to add an alternate address.
- In the Alternate Address section, enter:
- Address
- City
- State
- Zip Code
- Toggle Use Alternate Address to Yes.
📌 This ensures that when printing mail or generating letters, the alternate address is used instead of the primary address.

Step 3: Use Alternate Address in Print Mail
- When creating a mail template in Print Mail module, use the x:address merge field.
- If an owner has an alternate address enabled, it will replace the standard address in the printed output.
- Preview the mail to ensure the correct address is displayed.
📌 Example: A holiday greeting letter with the x:address merge field will automatically include the alternate address if enabled.

Step 4: Verify the Printed Mail Output
- Generate a sample letter.
- Confirm that the alternate address appears correctly in the document.
- If needed, go back to the Owner Directory and adjust the address settings.

How to Enable and Setup Owner Categories
Step 1: Enabling Owner Categories in Administration Setup
- Navigate to the Administration Setup section of the platform.
- In the setup options, locate the section labeled Directory Info (as shown in the first screenshot).
- Under Directory Info, find the Show Owner Category option.
- Select Yes to enable the Owner Categories functionality for the system.
- This setting will allow the display of owner categories within the Owner form and Owner directory grid.
- Click Save to apply the changes.

Step 2: Adding and Managing Owner Categories
- Once Owner Categories are enabled, navigate to the Owner Categories page within the Administration module (as shown in the second screenshot).
- You can create a list of default categories, as per your requirement such as:
- Home Owner
- Tenant Owner
- Builder Owner
- Investor Owner
- Commercial Owner
- Vacant Lot Owner
- To add a new category:
- Click the Add New button.
- Enter the desired category name (for example, Secondary Home Owner).
- Assign a sequence number to determine its order in the list.
- Save the new category.
- To edit or delete an existing category:
- Use the Edit (Disk Icon) or Delete (Trash Can Icon) icons before the Sequence column.

Step 3: Assigning Categories in the Owner Form
- When adding or editing an owner (as shown in the third screenshot), the Owner Categories section will now be visible.
- Click the Edit button under the Owner Categories section to assign or modify the category for an owner.
- Example categories: Tenant Owner, Home Owner, etc.
- Save the changes.

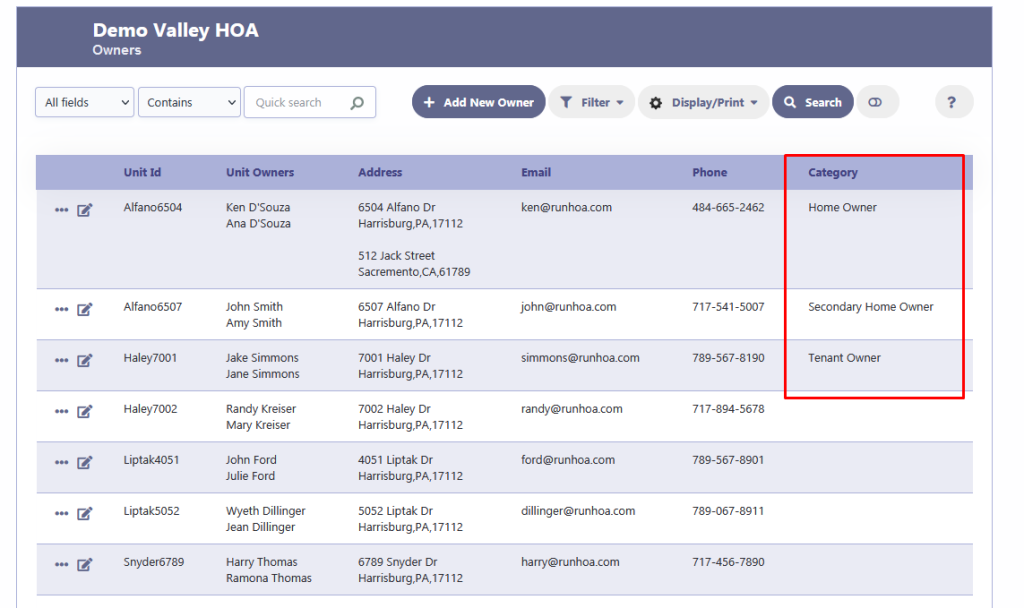
Step 4: Viewing Categories in the Owner Directory Grid
- After categories are set up, they will appear in the Owner Directory Grid.
- The category assigned to each owner will be displayed under the Category column for easy reference.
- This feature allows administrators to quickly identify different owner types such as Home Owner, Tenant Owner, Builder Owner, etc.

Note:
- This setup only needs to be done once, and all future owners will be categorized based on the list of owner categories you have set up.
- Only Administrators have access to view the owner categories.
Owner Linked Activities Setup

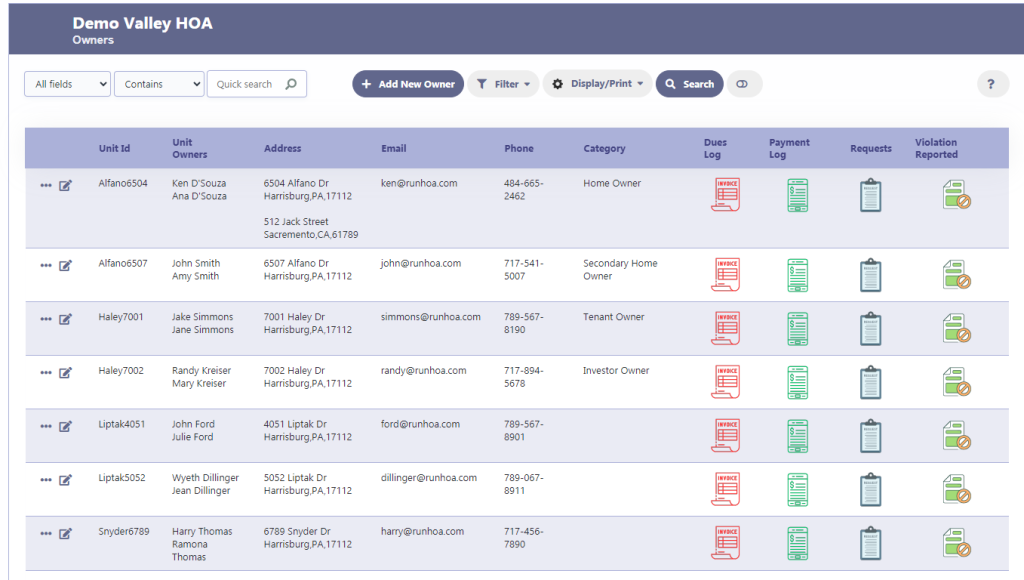
In RunHOA setup, the “Show Owner Activities” option must be set to Yes in the setup to display the four linked activity buttons for each owner. These buttons allow access to the following activity logs:
- Dues Log
- Payment Log
- Requests
- Violations
Once the setting is enabled, these activity buttons will appear in the Owner Grid. Clicking on any of the buttons will bring up the respective screen with detailed records for that particular owner’s dues, payments, requests, or violation history.

By default, these activity buttons are only visible to users with administrative privileges, ensuring that sensitive owner information is protected and accessible only to authorized personnel.
Adding Category Details for Owners in RunHOA
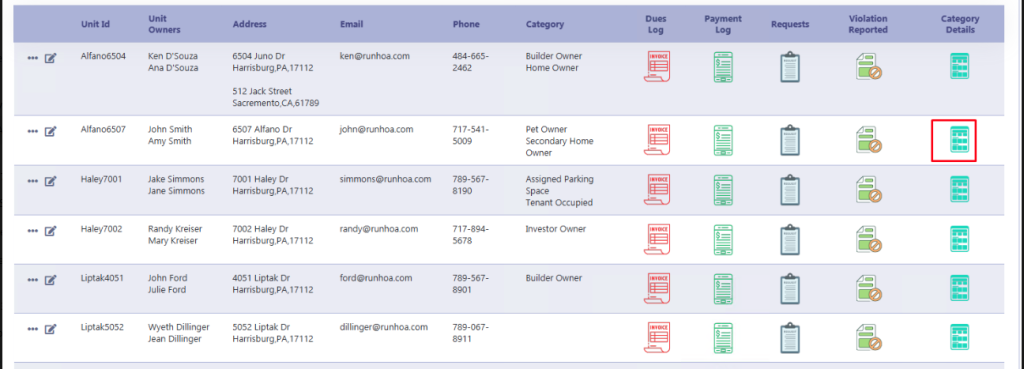
The Category Details feature in RunHOA allows you to assign additional details for specific categories (e.g., Pet Owner, Assigned Parking Space, Pool Access Key Id) to homeowners. Here’s how you can add or manage these details effectively:
Steps to Add or Edit Category Details:
- Enable Custom Category Details (If Not Enabled):
- Navigate to the Administration/Setup.
- Under Other Options, toggle the Allow Custom Category Details option to enable it.
- You can create a list of default categories, as per your requirement in Owner Categories such as:
- Home Owner
- Tenant Owner
- Builder Owner
- Investor Owner
- Commercial Owner
- Vacant Lot Owner
- Pet Owner
- Assigned Parking Space
- Pool Access Key Id

- Access the Owner List:
- Go to the Owner List page from the dashboard.
- Locate the homeowner for whom you want to add or manage category details.

- Open the Category Details Interface:
- Click the Category Details icon (displayed in the last column of the Owner List table).
- View or Add Category Details:
- The Category Details page will display existing category details for the selected homeowner.
- Click the + Add New button to create a new entry.

- Enter Details for the Category:
- Select the desired category (e.g., Pet Owner, Assigned Parking Space) from the dropdown.
- Enter the relevant details in the Category Details field (e.g., “Maltese” for Pet Owner or “601” for Assigned Parking Space).
- Enable for QR Code display on Membership Card

- Save Changes:
- Click Save to store the new entry or any updates.
- Edit or Delete Existing Details:
- Use the Edit icon next to a category to modify details.
- Use the Delete option to remove unwanted entries.
- You can also access the Owner Category Details by clicking on the info button on the Owner Grid


